Friday, February 15, 2013

February Mini Quilt

Unfortunately preparing to put the house on the market has imposed some limitations on my fabric availability. It is boxed up and in the cupboard down the hall so I can't easily choose what I need for the mini quilts. I have decided that I will draw up designs only and leave the making til next year. I am hoping that we will be settled in a new home by then.
February is still Summer here and one of my favourite things about Summer is the variety of luscious fruits so the Feb mini is a basket of my favourite Summer fruits.

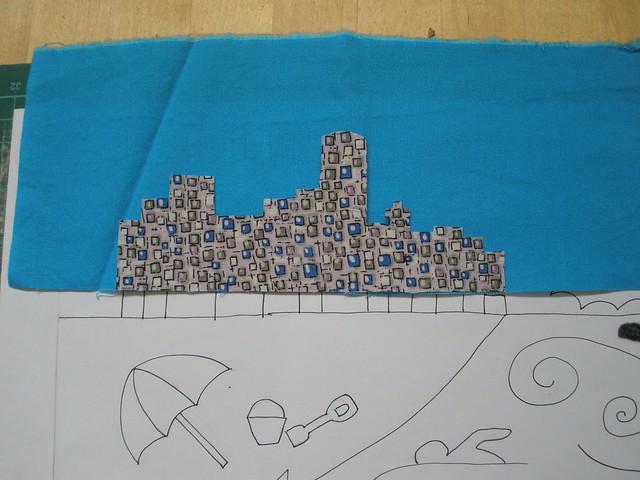
I did some searching for baskets of fruit in Google image and printed out several. Then I copied a basket shape and proceeded to load it with fruit. I had to look at some images of all my choices so I got the shapes just right.
I think it needs a little something on the right hand side to fill the gap just above the edge of the basket. Maybe I will put in a gift tag dangling from the handle with Feb 2013 on it.

From left to right:
Watermelon, apricots, raspberries, plums, bananas, mango, cherries, avocados and red grapes.

Here are the pattern sheets to download. Make sure you print out with no scaling or deselect fit to page.

Page 1
Page 1 reversed
Page 2
Page 2 reversed

The saga of my pattern download.
To get the reversed image for applique I have worked out that I need to scan the image as a jpg then reverse it and print it out with no scaling at 100%. Then I scan the reverse page as a PDF so you should be able to print out the PDF with no scaling so it prints out at the right size. I had to do it this way because the reversed jpg came out at some odd percentage for printing once I put it in the blog post but I can't make a reverse image with a PDF hence it goes jpg then reverse then scan again as a PDF. This is all so you can download and print as easily as possible. There is no point offerring a pattern that is too hard to make the right size. I think it only gives me a problem because I have drawn it on 12 inch paper and the scanner reduces it slightly to fit onto A4.

valspierssews

Sunday, January 27, 2013

Jan 2013

I have spent 3 weeks making this block.
First I decided I wanted a local scene to illustrate Summer. I found a a water view image with some cute boats that I really liked and started sketching on a 12 inch square sheet.

The image I used is copyrighted but here is a link to it.

I really wanted to imply the horizon over the sea so I put a bit of sea horizon with the sun over it. I looked up images for Gold Coast and Surfers Paradise skylines and copied it to fit as best I could. Normally I only see the view from Coolangatta beach but this view is from the ocean inland. I wanted to signify the great expanse of ocean somehow.

I had the boats in and a swimmer but when DH said we have never seen boats down there I knew he was right so I put in a windsurfer. In reality I  have only seen normal surfers and para surfers but I just liked the sail idea. By studying the pictures I found on google of windsurfers I realised I needed to make the window sections on the sail. I thought the date on the sail looked good.

I was so pleased I could find all the fabrics I needed in  my stash. I never thought I would find a use for the border fabric but I think it is perfect on this block.

I cut a strip for the sky and used a paper pattern piece for the beach.


Using the edge of the sea as a guide cut a piece of fusible applique paper in reverse. Fuse this onto a big piece for the sea and cut out the curve.


Fuse the sea to the sand along the curve.


I marked where the seam line between sand/sea and sky would be using the layout design.


Trim straight across 1/4 above the seam line.


Place the skyline using the layout design. Stitch around the top. The bottom edge will be in the seam.


I seamed the sky to the sea/sand. The sun was a tight fit so I added it last when the border was on.
I stem stitched the waves in no.5 pearl. Because the blue was dark I used white chalk to mark the waves for sewing.


I stitched the date on the sail in 2 strands of embroidery floss with back stitch.


The patterns gave me some problems. It was fine for me. I scanned the pages as jpegs then printed them. The size was 94% after scanning so I just printed at 100%.
When I came to share them the size changed a lot.
You can get the jpg's on my blog post.

valspierssews